| Home | > | Software | > | Sample Selection Tool FAQ |

|
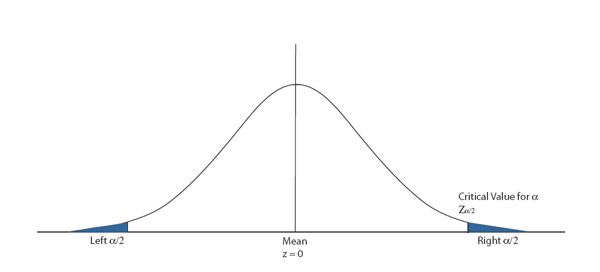
Product-specific Q&A 1. What is included in the Sample Selection Tool? 2. What model and assumptions are used in the Sample size calculator? 3. What is the maximum supported sample size? 4. What is the initial cost? Are there any additional costs? 5. Can multiple people use the product concurrently? Tool Requirements Q&A 10. What do I need to install the Tool? 11. How do I install the Tool? Product-specific Q&A: 1. What is included in the Sample Selection Tool? The Sample Selection Tool includes an Excel template and documentation on how to use the Template and built-in software to reduce manual effort. Nothing else is needed. The Excel template has buttons that create sample selections based on your inputs. You first enter the relevant information and the test selections are populated based on your inputs. 2. What model and assumptions are used in the Sample size calculator? We use the T-Normal distribution model simplified for use with central means (that is the 50% of the population extends in either direction from the mean) and with two-sided confidence intervals. This model is generally used in business to produce sample sizes for populations with unknown distributions and standard deviations (essentially a rough but generally suitable approximation useful for common business applications). The elements within the population are expected to behave in a consistent and "smooth" pattern without excessive clustering following the Normal bell curve distribution. The distribution pattern is expected to follow the shape in the graph as shown in Figure 1 below.
Figure 1. Bell Curve Normal distribution shape. The mean value is depicted at the origin z = 0 with the central density inside of the two-sided confidence interval segments excluded. This model requires two primary inputs (apart from the population size) that define how large the sample should be to meet the stipulated requirements: Margin of Error and Confidence interval. The Margin of Error is simply the difference between the sampled mean (easily determined) can be from the actual population mean (a theoretical value that may be impossible to determine). The Margin of Error controls the number of samples since a looser margin (such as 20% of the mean potential value) would require far fewer samples than a tighter margin for error (such as 5% or less). Since it is not generally practical to sample the majority of a population to get a tight Margin of Error, common practice is to allow a 10% margin. However, if such precision is required you can select down to a 1% margin with the Tool. It should be noted that pass/fail tests that are common in financial applications do not directly correspond to the stipulated margin since the margin assumes a numerical mean and pass/fail testing allows only a binary value. In these cases, if an accurate margin is required, an appropriate numerical scoring system would be required. The Confidence interval limits the number of outlying elements of the population by restricting the potential density to within the two-sided limit. The Tool provides for 95% and 99% Confidence intervals. Common auditing practice is to use a 95% confidence interval (corresponding to an alpha of 5%). A tighter confidence interval of 99% would open more of the curve for testing potential thus requiring more samples. Again, for pass/fail testing, the confidence interval calculations may not be effective since the outlying cases cannot be scored to fit within the bell curve. So, in these cases, the confidence interval can only be considered a rough approximation. Additionally, the T-Normal distribution requires at least 25 samples (assuming a larger population) to approach a Normal distribution. The model will tend to select the majority of items in small populations (under 30) due to this model requirement. Furthermore, this tool is intended for general business applications and is structured to be practical for that application. Use in more rigorous statistical or scientific applications is not recommended. The actual number of samples required for any particular application depends on so many factors that no tool can adequately provide a firm answer. If in doubt, we suggest that you consult appropriate resources with specific expertise in the specific type of testing you are conducting and get their advice. 3. What is the maximum supported sample size? Our product was designed for large sample sizes. We can support up to 10,000 samples per workbook/testing sheet. 4. What is the initial cost? Are there any additional costs? The product is available for $199 (US Dollars). You purchase the Tool online with payment by PayPal. When the transaction is completed, you will be directed to a secure page where you can select the file to download. The license is per Company or legal entity. CPA and consulting firms or other companies that wish to use our products for their customers will need to contact our sales team for more details. There are no ongoing maintenance costs. Once you have purchased the Model, you own the license for it. Ongoing technical support services are on a per-incident basis with no support contract required. 5. Can multiple people use the product concurrently? Yes. Not only can multiple people work concurrently, we advise it. However, each person would be using their own testing workbook to prevent over-writing each other's work. That depends on what is being tested. However, there are certain similarities with any testing regime. Your population must be known and each element within the population must have a numerical (integer) designation that we use in our selections. Once you define the population, you select or calculate the sample size and we use a random number offset into the population and a integer interval within the population to select items following a regular pattern. After the items are selected, the person performing the testing will go out and inspect the item against the stipulated test plan and verify the results. The final result of testing each item could be a number, a pass/fail determination or any other meaningful data. With testing complete, you would then set the status of the testing workbook and hand the test results over for review. This is dependent on the objects under test, the test plan, policies and procedures and many other factors. We can however suggest that you use the fields provided to indicate test results and you can use the following rows to sum, compare or flag the values if needed. The product can be purchased from our website at www.procognis.com/products/sample-selection/sample-tool.php. It is purchased via PayPal any you will download the package you desire when the transaction is complete. We're sorry but once you have downloaded the file, refunds will not be possible. Technical support is available via email on a per-incident basis. If encounter technical issues, simply email us at support@procognis.com. We will make every effort to resolve your technical or usage issues. We also provide technical background whitepapers: Download our Section 404 whitepaper (420KB) Download our 404 Tool Brochure (795KB) Tool Requirements Q&A 10. What do I need to Install the Tool? You will need Microsoft (R) Office XP (2002 or later) with the Excel program installed. The Operating system you use must be supported by Office XP (all recent Windows operating systems, see the Microsoft Office website for more information). The Tool uses Visual Basic scripts to perform automation task so you must enable Visual Basic scripts (instructions provided with the Tool on how to enable scripting). The Tool also requires about 20MB of disk space to allow for file storage and new file creation. We provide two installation methods: Windows Installer and Self-Extracting Zip file. If you have Windows XP or later, we recommend using the Windows Installer option (you can also install the Microsoft Installer software on Windows 2000 and NT 4.0 platforms). The Self-Extracting Zip file is an executable that can be run on any Windows platform. You simply run the executable the same as any executable (.EXE file) from Window Explorer and the Zip file will prompt you to select a directory to install ('Extract To:'). You press the 'Start' button and files and directories are simply copied to the directory you select. After installation on either method, a directory is created that contains the template file and documentation. Simply read the documentation PDF and you are ready to use the Tool. 11. How do I install the Tool? Simply run the Installer file or the Executable you downloaded following the PayPal transaction. The installation software will ask you where you would like to install the files on your hard drive or network. Both applications default to installing the software in the current directory (where you saved the installation file). After installation is complete, a shortcut will be created on your desktop that will link to the working template file. For the Windows Installer version, should you want to delete the installation, you should use the Add/Remove programs feature in the Control Panel or simply use the Remove option when re-running the installer.
|
|
Financial Reporting Solutions
©2004,
2005. ProCognis, Inc. All Rights Reserved. Modified
March 30, 2009
Service
Agreement & Privacy Policy